|
アプリケーションの立ち上げからデータの保存方法までの基本的な操作を説明します。
 |
操作項目 |
起動
画面の構成
地図データの読み込み/表示
レイヤの重ね合せ
レイヤ名の変更
ラベルの表示/設定
レイヤの色の変更
セル値の表示/変更
プロジェクトの保存と終了
|
起動
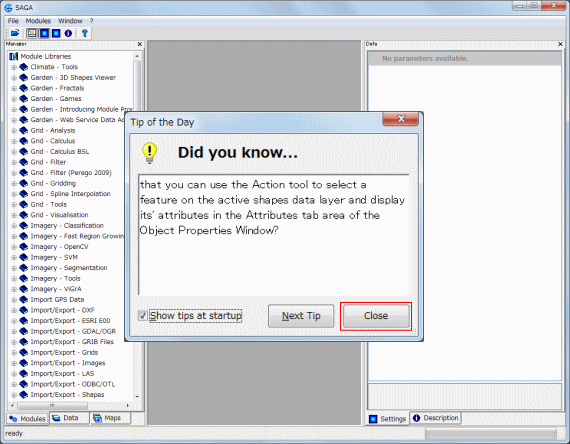
saga_gui.exeをダブルクリックすると、下の画面が立ち上がります。[Close]をクリックして[Tip of the Day]画面を閉じます。※[Tip
of the Day]はSAGAの基本操作/仕様についての説明画面です。
Top |
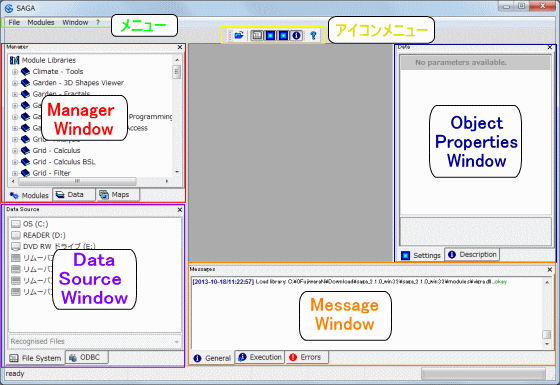
画面の構成
各画面の表示のON/OFFは、[メニューバー] Winodow - Show Manager Window/Show Object Properties Window/Show Data Source Winodw/Show Message Window で設定することができます。
Top |
地図データの読み込み/表示
SAGAで扱う地図データのフォーマットについて、ラスタはグリッド(Grid)と呼び、ベクタはシェイプ(Shape)と呼びます。
ラスタ : グリッド(Grid) ex) *.bmps/*jpg/*tif/*img..
ベクタ : シェイプ(shape) ex) *.shp
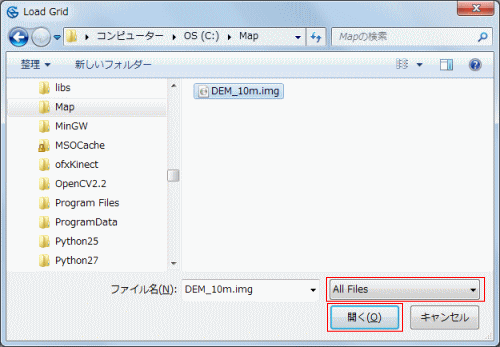
選択方法: [メニューバー] File - Grid - Load
※他にも、[Data Source Window]画面のツリーから直接ファイルをダブルクリックして読み込むこともできます。
SAGAのグリッドファイル(*.sgrd)以外のファイルを選択する場合は、ファイルの種類を[All Files]にし、地図データファイルを選択後[開く]をクリックします。
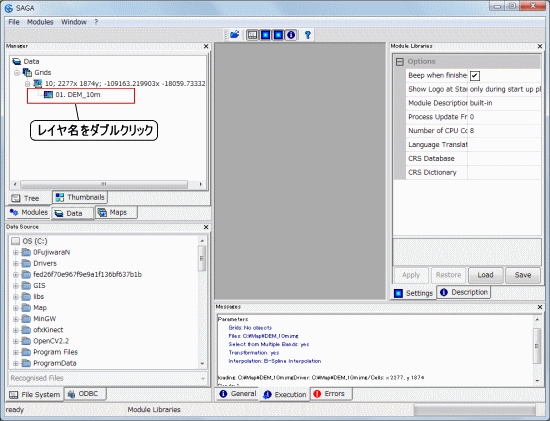
[Message Window]に処理結果が表示されます。地図画像は表示されません。[Manager Window]の[Data]タブをクリックします。
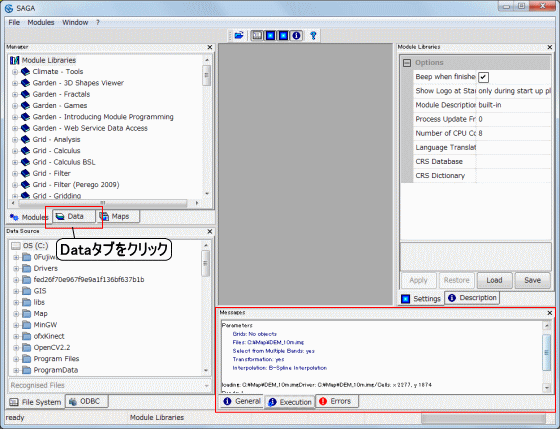
ツリー内にレイヤ名が表示されています。
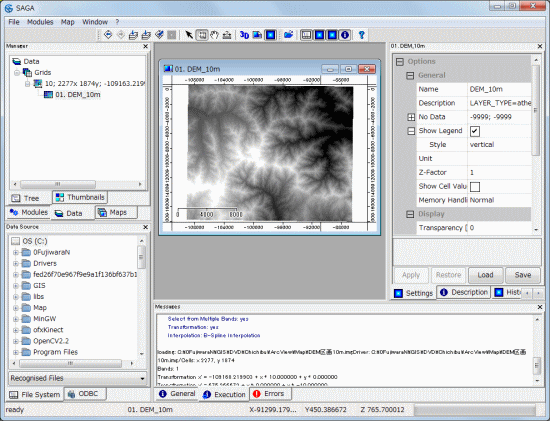
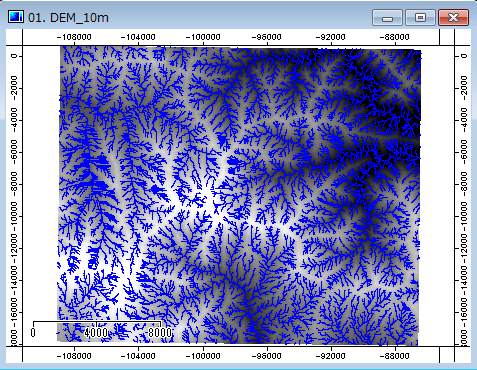
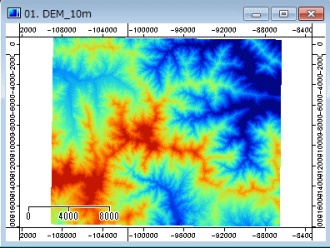
地図画像を表示します。レイヤ名をダブルクリックします。
地図画像が表示されます。
Top |
レイヤの重ね合せ
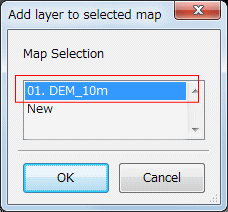
グリッドレイヤにシェイプレイヤを重ね合せて表示します。重ね合せたいレイヤをダブルクリックすると、[Add layer to selected map]画面が表示されます。
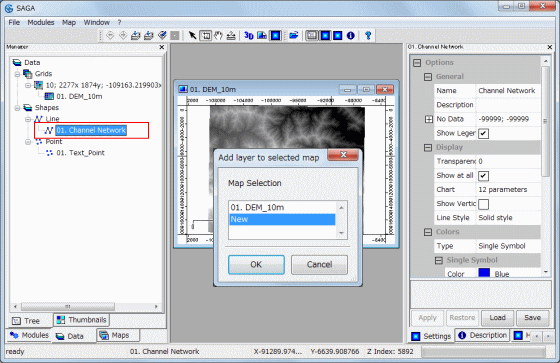
重ね合せたい地図画像(レイヤ名)を選択して[OK]をクリックします。
選択された地図画像の上に重ね合せて表示されます。
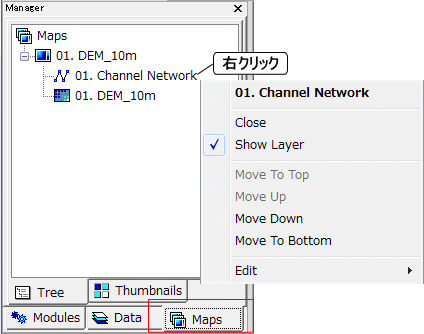
Manager Windowの[Map]タブを選択すると、レイヤの重なりの順番でツリーに表示されます。順番を変更したり非表示にしたい場合は、レイヤ名を右クリックすると、設定メニューが表示されます。
Top |
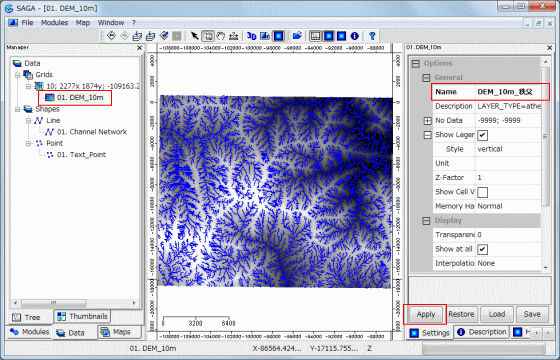
レイヤ名の変更
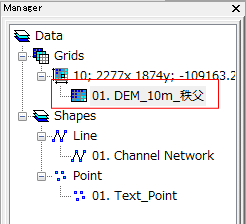
Manager Windowの[Data]タブを選択し、変更するレイヤ名を選択します。Object Properties Windowの[Setting]タブを選択し、一番上の[Name]項目のレイヤ名を変更します。[Apply]をクリックすると、変更されます。
Top |
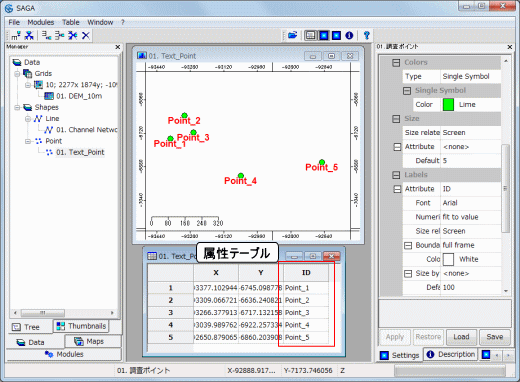
ラベルの表示/設定
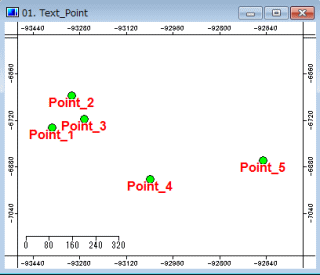
地図画面上にラベルを表示します。今回は、ポイントフィーチャのIDのラベルを表示します。
※属性テーブルの表示は、レイヤ名右クリック - [Attributes] - [Show]を選択します。
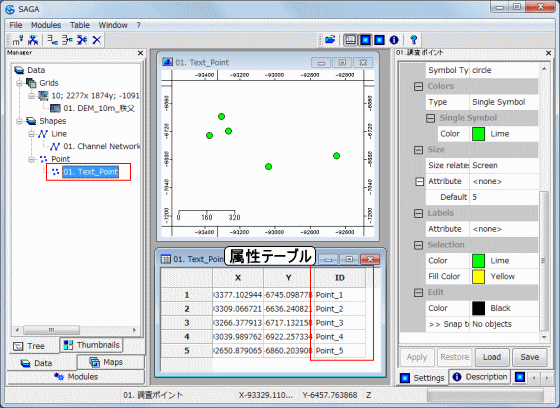
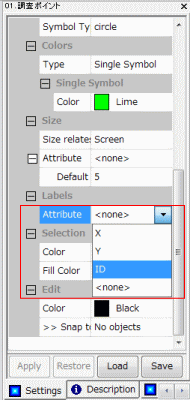
Object Properties Windowの[Setting]タブを選択し、Labelsの[Attribute]項目を選択するとコンボボックスが表示されます。表示したいラベルの属性データを選択します。
[Labels]項目に設定メニューが表示されます。[Font]を選択するとボタンが表示されるのでクリックします。[フォント]画面が表示されます。書式を設定し、[OK]をクリックします。

[Apply]をクリックすると、ラベルが表示されます。
Top |
レイヤの色の変更
レイヤの色を任意の色に変更します。
ラスタ(グリッド)データ
Manager Windowsの[Data]タブを選択し、変更するレイヤ名を選択します。Object Properties Windowの[Setting]タブを選択し、[Color]項目をクリックするとボタンが表示されるので、クリックします。

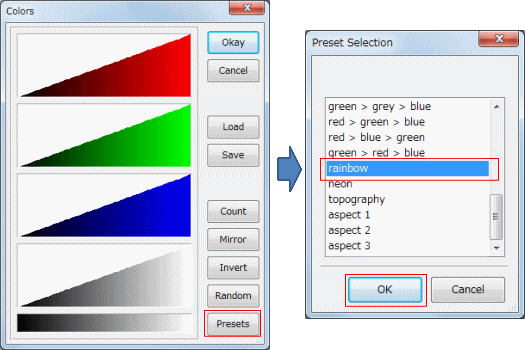
[Color]画面が表示されます。[Presets]をクリックすると、[Preset Selection]画面が表示されます。色を選択して[OK]をクリックし、[Color]画面に戻って[Okay]をクリックします。]
[Apply]をクリックすると、設定した色が地図に反映されます。
ベクター(シェイプファイル)データ
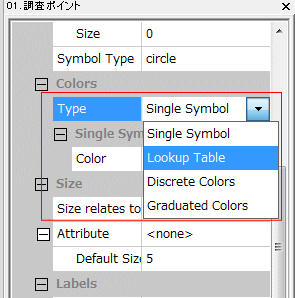
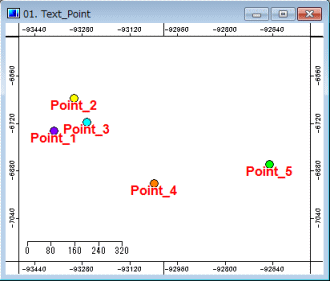
ポイントの色を属性値に合わせて変更します。今回は、ポイントフィーチャの色をID別に表示します。
※属性テーブルの表示は、レイヤ名右クリック - [Attributes] - [Show]を選択します。
Object Properties Windowの[Setting]タブを選択し、Colorsの[Attribute]項目を選択するとコンボボックスが表示されます。ポイントフィーチャをID別に色分けするので、[Lookup
Table]を選択します。
[Colors]項目に設定メニューが表示されます。[Attribute]項目[Table]を選択するとボタンが表示されるのでクリックします。[Table]画面が表示されます。

各ポイントフィーチャの色と数値分類を設定します。今回はID別に分類したいので、[MINIMUM(MAXIMUM)]項目に「Point_1」と入力します。
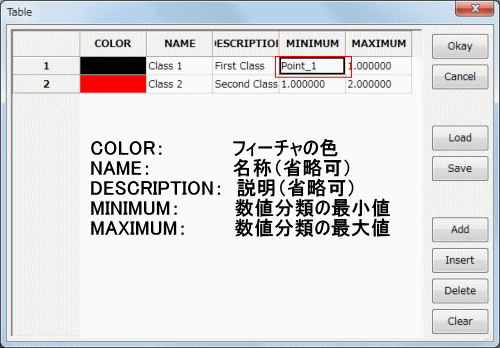
[Add]をクリックして、分類分の行を追加します。同様に設定値を入力します。[Okay]をクリックします。
※設定値が数値の場合、[MINIMUM][MAXIMUM]に値の範囲を入力します。
[Apply]をクリックすると、設定した色が反映されます。
Top |
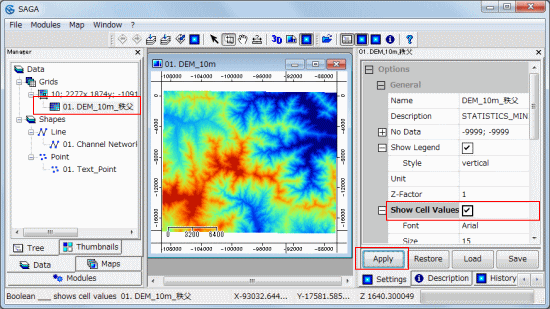
セル値の表示/変更
表示
グリッドのセルの値を表示します。
Manager Windowの[Data]タブを選択し、表示するグリッドのレイヤ名を選択します。Object Properties Windowの[Setteing]タブを選択し、[Show
Cell Values]項目のチェックボックスにチェックを入れ、[Apply]をクリックします。
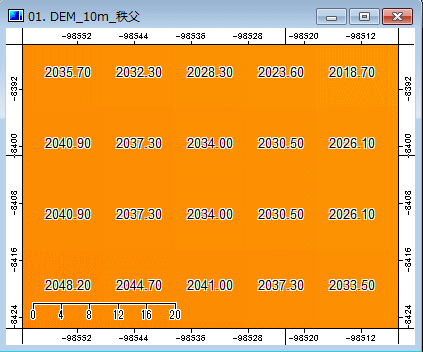
地図を拡大すると、各グリッドの値が表示されます。
変更
グリッドのセルの値を変更します。
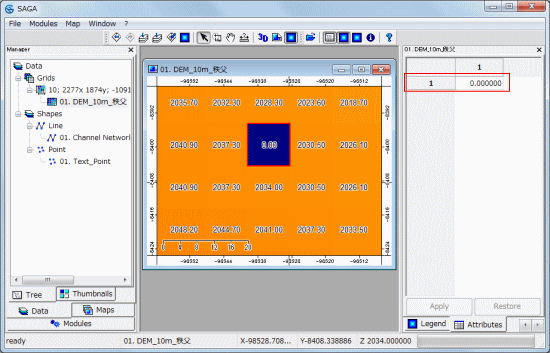
Manager Windowの[Data]タブを選択し、変更するグリッドのレイヤ名を選択します。メニューバーの矢印ボタンをクリックし、地図上のグリッドを選択します。Object
Properties Windowの[Attributes]タブを選択すると、選択したグリッドの値が表示されています。
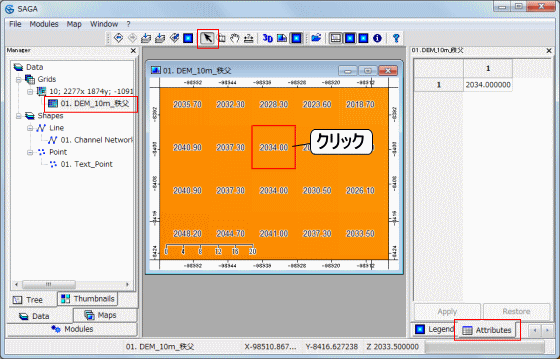
変更する値を入力し、[Apply]をクリックすると、セル値が変更されます。
Top |
プロジェクトの保存と終了
プロジェクトの保存
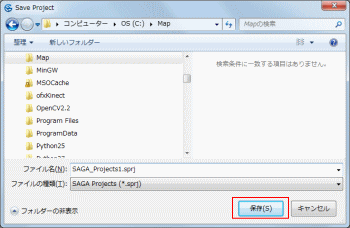
選択方法: [メニューバー] File - Project - Save Project As・・・
プロジェクト名を入力し、[保存]をクリックします。
[Close and save modified data sets...]画面が表示され、保存されていない地図データのリストが表示されます。保存する地図データにチェックを付けて保存先を指定し、[Okay]をクリックします。プロジェクトと地図データが保存されます。
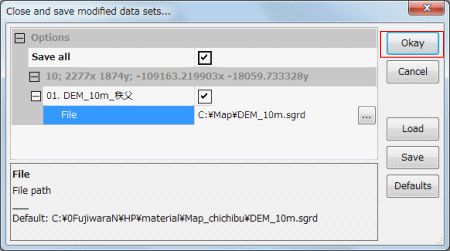
※地図データを編集した場合、保存されるまで元データには反映されないのでご注意ください。
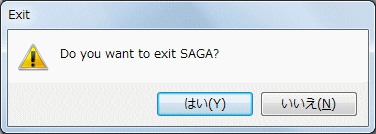
プロジェクトの終了
選択方法: [メニューバー] File - Exit
[Exit]画面が表示されるので、[はい]をクリックするとプロジェクトが終了します。
※地図データが更新され、保存されていない場合は、[Close and save modified data sets...]画面が表示されます。
Top |